Gui Basics
Written by Fagiano0
In this tutorial you’ll learn how to make a simple gui with a button that triggers code, while learning the basics in the process.
CONTENTS:
Installing MyGui Editor
Before we can create our guis we’re gonna need to install the MyGui editor.
You can download a compiled version for Scrap Mechanic 0.6.x from here (compiled and uploaded by QuestionableMark)
Once you’ve installed and unzipped it, open the release folder inside of it and open LayoutEditor.exe, you can also create a shortcut for easy access to it.
Creating a Basic Gui
Now that you’ve opened the editor, let’s create a basic gui.
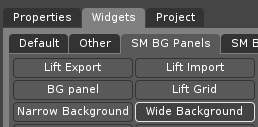
On the right you will see there are multiple tabs, including Widgets, click it. The buttons here are used to select the type of widget you want to add, then to actually create it you have to click and drag your mouse inside of the gui (checkerboard pattern)
Note: Some tabs like
Default,Other,SM BG Panels,SM Background, etc. will only be visible if you expand the side panel.

Again, for this tutorial we’ll be making a gui with a button that triggers some code, so:
- Open the
SM BG Panelstab and selectWide Background, then create it.
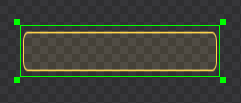
- Now let’s add a button by opening the
Defaulttab in theWidgetstab and selectingButton. - This time, when you create the button, drag your mouse on top of the background widget you placed earlier to make it a child of it.
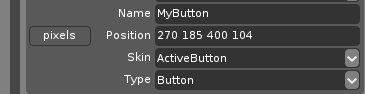
- Switch to the
Propertiestab, here you can change properties about your widget, like the name which is useful for referencing widgets from code, the skin which determines the look of your widget, the text if the widget type and skin supports it, etc. - Since we’ll be referencing this button with code later, let’s give it a name, in my case I’ll call it
MyButton. - Now let’s give our button a different look by changing its
Skinto whatever you want, in my case I choseActive Buttonbut you can choose whichever skin you want.
- To add text to it, scroll down to the
TextBox Propertiesand give it aCaptionandFontName, the others are optional.Note: The game doesn’t load all characters for some fonts, unloaded characters will appear as
⌧.
A list of all fonts and their characters can be found here.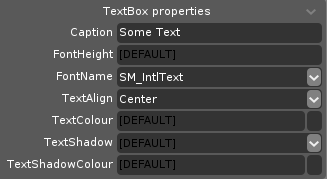
- Now that we’re almost done switch back to the
Propertiestab and select one of the widgets you added, you’ll see aPositionproperty with apixelsbutton to the left of it, you can click it to change the position mode and repeat it for all your widgets.Note: You can change the position mode of widgets from
pixelsto%anytime, sometimes working with widgets in%might be more difficult or lead to misalignments. It is recommended to make all your widgets’ position modes%after you’re done working on the gui. The%mode is needed to make guis work correctly with different screen resolutions.

- Great, now do
Ctrl+Sor pressFileandSaveand navigate to your mod’s folder, then save it somewhere in there. It is recommended to create aLayoutsfolder inside of the pre-existingGuifolder and save it there.
Accessing Your Gui with Code
Now that we’ve made a gui, let’s access it and make it interact with our code.
The following example is a part script that opens the gui when interacted with and sends a message to the player when they press the button.
MyPart = class()

--Called when the part is created.
function MyPart:client_onCreate()
    --Creates the gui from the provided layout file, with some extra settings.
    --Change the path to where you put your gui layout file.
    self.gui = sm.gui.createGuiFromLayout( "$CONTENT_DATA/Gui/Layouts/CoolGui.layout", false, {
        isHud = false,
        isInteractive = true,
        needsCursor = true,
        hidesHotbar = false,
        isOverlapped = false,
        backgroundAlpha = 0.0,
    } )
    --Binds a callback to be called when the button is pressed.
    --Change "MyButton" to your button name.
    self.gui:setButtonCallback( "MyButton", "cl_onButtonPressed" )
end

--Called by the button and receives the buttonName.
function MyPart:cl_onButtonPressed(buttonName)
    --Sends a message to the player that pressed the button.
    sm.gui.chatMessage(buttonName.." pressed!")
end

--Called when the player interacts with this part.
function MyPart:client_onInteract(character, state)
    if state then
        --Opens the gui.
        self.gui:open()
    end
end
General Advice
- You can press
Ctrl+Tto preview your gui in the editor. - The
.layoutfiles produced by MyGui are actually just.xmlfiles, you can manually edit them, a useful use case is duplicating widgets. - Try to make your gui look good by avoiding the use of default MyGui skins or old sm skins and stretching widgets with skins that don’t support it.
- Don’t use skins ending in
_Dark, they don’t work in-game.